

With the upcoming nebula season approaching, the anticipation for clear nights, dark skies, and stunning nebulae is growing. To be as well-prepared as possible, I’ve spent the past few weeks further improving the setup of my Baader Travel Companion. The goal was to optimize the light path, eliminate reflections, and make the mechanical setup as light-efficient as possible.
The reason: Small reflections with a big impact
I’ve been using my Baader Planetarium APO 95 CaF2 Travel Companion for quite some time now, and it has delivered brilliant images on many nights. However, after switching from my beloved EOS R mirrorless camera to my new full-frame mono astro camera-and simultaneously rebuilding my setup-I faced some major issues earlier this year. Eventually, the problem was identified and largely resolved: https://astrocamp.eu/en/internal-reflections-from-hell/
Still, I later noticed subtle reflections in the images again-especially in brighter nebula regions or during very long exposures. It was only after switching to the cooled astro camera and having the ability to significantly “stretch” the material in post-processing that these remaining reflections became apparent.
At first, the problem seemed marginal, but upon closer inspection, these internal reflections disturbed the uniformity of the background and reduced the depth of detail in fainter structures. Especially when capturing large nebulae, every point of contrast counts-so it was time for another rebuild to eliminate every compromise.
Unfortunately, the problem was the OAG (Off-Axis Guider).
The Off-Axis Guider had to go
An important factor was the Off-Axis Guider (OAG), which I had been using for guiding. Although it is technically a useful tool, in my specific setup it created a bottleneck in the light path. More than that: unfortunately, it was the source of the remaining internal reflections.
I therefore decided to remove the OAG completely and switch to a separate guide scope. This step alone significantly reduced the overall complexity and potential sources of error in the optical path.
Removing the OAG gave me so much space behind the field flattener that I had enough room to move the Baader quick-release system behind the flattener while still achieving the required backfocus of 76.1mm.
Installation of the Baader Planetarium UFC Tilter

Besides eliminating reflections, I had a second goal that I was able to achieve with the UFC Tilter, which perfectly complements the UFC system: consistently using components with the maximum internal diameter to minimize vignetting.
Here, I completed the transition to Baader components in the light path: the Tilter was the last remaining part missing from my Baader-only telescope setup. More importantly, using the UFC Tilter allowed me to maintain a minimum aperture of M68 from the telescope all the way up to just before the camera, only switching to M54 right in front of the camera.
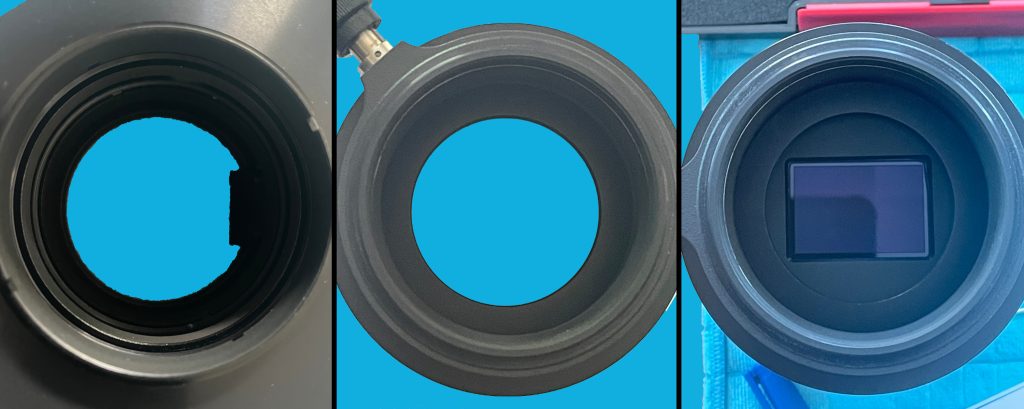
All interior surfaces of the Baader components I use are matte blackened and equipped with light traps to eliminate any stray light sources.
The camera now sits directly and squarely on the optical axis, without any tilting or play—a detail often underestimated but crucial for achieving consistent sharpness across the entire frame, especially with large-format sensors.
Tilter adjustment
The UFC Tilter, like all tiltters from the Baader Planetarium lineup, is adjusted via three pairs of screws on the side of the tilter. This design allows for adjustment even with the entire optical train fully assembled.
Using the UFC Tilter also gives me an additional fantastic feature that greatly simplifies the adjustment: In my setup, the UFC base sits directly in front of the camera, and in front of that, connected via an S70 dovetail ring, is the UFC Tilter, which in turn connects to the M68 components through another S70 dovetail ring.
The amazing side effect of this arrangement is that the tilter can freely rotate within the adapter before being tightened down. Positioning one pair of the tilter’s screws in the middle of one of the sensor’s long edges makes the subsequent tilt adjustment much easier in practice!
Technical implementation overview:
- Mono full-frame CMOS astro camera – SkyeEye62AM
- Baader Planetarium UFC system
- Baader Planetarium CMOS-optimized 50.4mm filters
- Baader Planetarium UFC Tilter
- Baader Planetarium M68 extension tube
- Baader Planetarium M68 quick-release system
- Baader Planetarium M68 CaF2 field flattener
- Baader Planetarium APO 95 CaF2 Travel Companion

First result – and why the effort is worth it
After the rebuild, I was fortunate to have several clear, moonless nights. I was able to test the new setup directly on a deep sky object. I chose the large emission nebula Sharpless 119. Over the course of five nights, I collected about 15 hours of data for my first astrophotography image of the new nebula season in LRGB (using Baader filters).

Already after the first data integration, it was clear: no disturbing stray light, a significantly more uniform background, and better-defined details in faint structures. Finally, the result I had been eagerly anticipating for so long.
Conclusion: Baader Planetarium – powerful impact
The rebuild cost me several evenings and a lot of thought, but the result convinces me completely. I not only solved the reflection problem but also laid the foundation for even higher-quality astrophotography-just in time for the upcoming nebula season.
If you’re facing similar issues with reflections, vignetting, or instability in your setup, my strongest advice is: don’t skimp on adapters and components in your optical system! Often, simple improvements there can have a huge impact on image quality.
I’m now looking forward to many clear nights-and to the first real deep-sky projects with the new setup. In fact, for me, astrophotography with my mono setup on the Baader APO truly begins now.


